So, I'm going on vacation... so to entertain you I'm going to talk about some things so when you read this you won't be completely bored and forget about my blog entirely... ok, so, 9 things to do while I'm gone, one for each day...
1. Visit my guest post at Alyssa's!
Link2. Visit Alyssa's post at my blog!
Link3. Someday Crafts featured me:
Link

4. Visit Hannah's blog, where she's hosting Creating Smiles Week. I'll be guest posting on Monday August 8. A'll (that's what i call Alyssa) be there too, and a bunch of other bloggers with tutorials! August 7th-August 13. I'll be looking if I've got wifi. To see what it's all about: Link 5. I STILL LOVE COMMENTS! Don't forget that! I might be able to read them at the hotel if there's wifi, and maybe post. :{
6. It's funny, if you guest post, you get WAY more publicity, even if you only have small blogs (like me and A's... though she only has 27 more followers than me... sniff...I'm kidding...sorta...). If you want your blog to get more publicity, guest post! It's really fun, too. :)
7. I knit a beret! For some reason I like to pronounce them like 'barrettes,' like a hair clippy. If you want a pattern, it's really easy:On size us 8 circular needles, CO 76 sts. PM.K2 P2 for 2."*Kf&b, K1* repeat. You should have 115 sts I think. If you want to use a different increase, do this instead: *M1, K2*Next row, evenly increase 5 sts across the row. 120 sts. Work in stockinette stitch (knit every row) till it's about 5." Begin crown decreases:1: *K4, K2tog*2: K3: *K8, K2tog*4: *K7, K2tog*5: K6: *K6, K2tog*You can switch to dpns here, but I just found the middle of the stitches and pulled the wire through, separating the stitches on either side of the needle, like magic loop kind of.7: *k5, k2tog*8: *k4, k2tog*9: k10: *k3, k2tog*11: *K2, k2tog*12: *k1, k2tog*13: *k2tog*Now cut the yarn leaving a tail and thread through remaining stitches. Pull tight and weave in ends. I used Noro silk garden scraps (silk, mohair, lambswool) and some Noro 100% wool scraps.This is loosely based from the pattern blushing beret.
And this is the typical, artsy, hipster pic, with the cool awesome camera... that your sister saved from being thrown away at an e-waste program where people throw away old electronics... Of course, it doesn't have any film, but it's still a super nice camera don't you think? (and who's that gorgeous girl there? oh, it's me... just kidding...)
8. As simple as it may be, I made a necklace! A simple little one that you might see on Etsy--except they probably use quality materials, clasps, etc.
 String on the beads.
 Tie knots at either end so the beads won't slide around.
 Tie a fisherman's knot so that you have an adjustable necklace, and tie a knot on the ends.
EDIT: added. Another thing for you to do while I'm gone.
9. We made these in advance for some nice dessert/breakfast treats on the road. Black bottom cupcakes!
BBC
Topping: mix together till chunky. The texture for us when we make it is usually chunky and sticks to a spoon when you spoon it into the cake.
1 (8 oz) package of cream cheese
1/3 c sugar
1 egg
1/4 tsp salt
1 c chocolate chips
Cake Part: mix together till smooth.
1 and 1/2 c flour
1 c sugar
1/4 c cocoa
1/4 tsp salt
1 tsp baking soda
1 c coffee (already made)
1/2 c oil
1 T vinegar
Fill cups 1/2 way with batter.
Put 1 Tbsp topping in each. DON'T MIX. Just plop in some topping. It might sink a little, which is fine.
Bake 350 F for 30 minutes.
Makes 18-24 cupcakes. For some reason something went wrong and we got BBM--black bottom muffins. 'Course, if you rearrange the letters--BMB--without the 'o' that would be the 'bomb.'
Our topping for some reason was liquidy, and we used a lot because we had so much. I think itwas the order we mixed the ingredients, because usually they look like this, if not better:
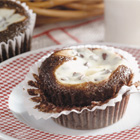 SourceHowever, they still tasted good. Unlike the recipe above, we use coffee in ours. Which usually gives me a caffeine/sugar high, but it's all good...
That's all for today!If you actually listen to the things listed, you'll have 8 9 things to do before I come back. Then you'll just have to wait two one days. ;)See you in 10 days time! :{
o(^__^o)